Camera Scanning Film Setup: Gear, Alignment, Focus and Exposure, Step by Step
The short answer
Camera scanning (also called DSLR scanning or digitising) means photographing your film with a digital camera and a macro lens, then turning the RAW files into positives in inversion software. Your own camera takes the place of a film scanner.
You need five things: a camera, a macro lens, a light source, a film holder and a stand. A few small tools and pieces of software come into the steps as well (the list). The steps go in this order:
- Turn on the light, darken the room and dust the film
- Square the camera to the film
- Check the light for unevenness
- Lock your camera settings
- Focus
- Set the scan exposure
- Shoot the roll on the same settings
- Invert to positives
The two things that make the biggest difference to the result are focus and scan exposure. You can get both right by hand, but not by watching the camera's display alone. This guide spends most of its time on how to check them. It covers colour negatives only, not black-and-white negatives or slide film.
This guide is written by the person who builds Loupe, a camera scanning app for SONY cameras and the Mac.
What gear you need, and what it has to do
There's no set shopping list. What follows is what each piece needs to do.
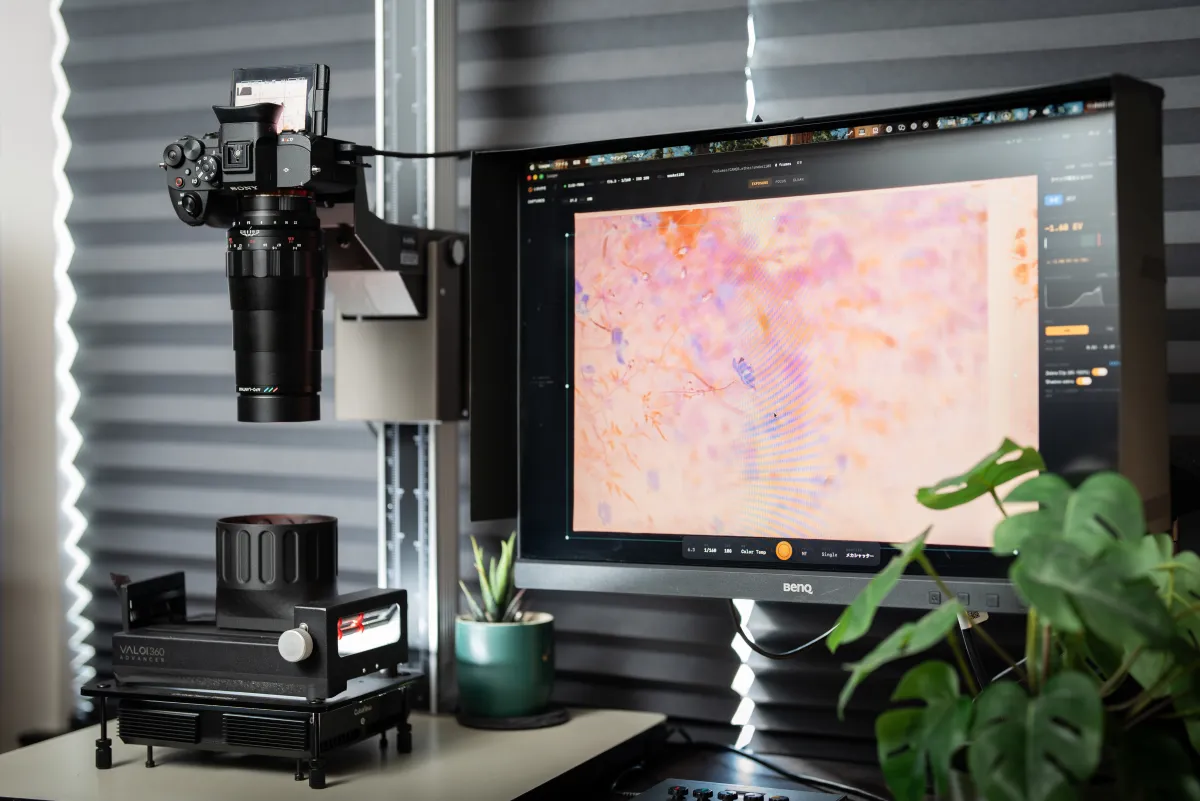
Camera
Any interchangeable-lens camera that shoots RAW and has manual exposure will do, whatever the brand. Being able to magnify the live view to check focus makes the work much easier.
Upgrading to a higher-resolution body for 35mm gains less than you might expect. When the frame fills the sensor and you stop down to around f/6.3, the numbers say extra pixels add little resolution, because diffraction gets there first. Diffraction is the blur from light spreading as it passes the aperture, and it grows the closer you focus and the further you stop down. For medium format, shot from a little further away, more pixels make more of a difference.
Macro lens
To fill a full-frame sensor with a 35mm frame (36×24mm), you need a macro lens that focuses to life size (1:1) or close to it. On an APS-C camera, the ratio of sensor to frame size means about 0.7× is enough.
Most people use their system's full-frame 1:1 macro, such as the SONY FE 90mm F2.8 Macro G OSS, the Nikon NIKKOR Z MC 105mm f/2.8 VR S or the Canon RF100mm F2.8 L MACRO IS USM. The author uses a Voigtländer MACRO APO-LANTHAR 110mm F2.5.
Light source
You need a flat panel that lights the film from behind. It has to do three things:
- Glow evenly across its whole surface
- Give soft, diffused light
- Hold its brightness steady while it's on
Diffused light makes dust and scratches on the film less visible. Light that has been gathered through a lens into a parallel beam (collimated light) makes them stand out sharply.
If you're not sure where to start, a white LED panel sold for film scanning with a high colour rendering index (CRI) is plenty. There are also light sources that use separate red, green and blue light. How to read the CRI number is covered under common misconceptions.
White panels that come up often include CineStill's CS-LITE, Negative Supply's Light Source and Kaiser's Slimlite Plano. On the RGB side there are Scanlight and CuteNew Design's PRO RGB Light, which is what the author uses.
Film holder
Use something that holds the film flat and a little above the surface of the light.
A holder that sandwiches the film between glass keeps it flat more easily. The trade-off is that rainbow rings (Newton rings) can appear where the glass meets the film. If you go that way, choose glass treated to prevent them.
Holders that come up often include Negative Supply, VALOI (the 360 and easy35), pixl-latr and Nikon's ES-2. The author uses a VALOI 360 Advancer V2.
Load the film with its matte side (the emulsion) facing the camera to cut down on surface reflections.
Stand
Use a copy stand, or a tripod that can point the camera straight down. What matters is that the camera and the film don't move relative to each other while you shoot.
Some people repurpose the column of a second-hand enlarger. The author uses an LPL DS5 copy stand.
Small tools and software for the steps
- A small mirror (for squaring the camera)
- A blower, an anti-static brush and gloves (for dust)
- A remote release (or the self-timer)
- A tool that can read RAW values (for the scan exposure)
- Inversion software (a plug-in for your RAW editor, or a standalone app)
Camera scanning, step by step
1. Turn on the light, darken the room and dust the film
An LED light isn't stable when you first switch it on. Turn it on when you start, and wait for it to settle before you set the scan exposure. The author's LED panel took about 25 minutes. How long yours needs depends on the light.
Turn the room lights off when you shoot, so the only light is your light source. Room lights reflect off the surface of the film. Light from the source itself can also bounce off the lens or camera back onto the film and show up as uneven patches.
The surest way to deal with dust is to remove it before you shoot. Blow it off with a blower, and use an anti-static brush for anything that stays. Wear gloves when you handle the film.
You can look for dust in software afterwards, but it can't reliably tell dust from grain and fine detail. To do what a film scanner's infrared dust removal does, a camera needs special gear, such as a body converted to shoot infrared.
2. Square the camera to the film
If the sensor isn't parallel to the film, one side of the frame goes out of focus. With enough tilt, there's no focus position that gets the whole frame sharp at once. Stopping down hides a little of it, but stop down too far and diffraction softens everything instead.
Use a mirror to square things up. Lay a small mirror face up where the film goes. In the live view, find the reflection of your lens, and adjust the camera until that circle sits in the middle of the frame. The reflection will be blurred, and that's fine: what matters is that the centre of the circle lines up with the centre of the frame. Keeping the room lights on while you do this makes the reflection easier to see. Correct the angle with your tripod head, or by slipping thin card under the stand or the holder. A spirit level can only get you close, because it can't compare the sensor and the film directly.
3. Check the light for unevenness
The edges of the frame often come out darker than the centre. That comes from the light falling off at its edges, from lens vignetting, or from both. A difference of about 10% is invisible to the eye.
To check, shoot one frame of the light alone, with no film in. Open it in your RAW editor and push the contrast hard, and the dark edges and any patchiness will show. Some editors correct lens vignetting automatically, so turn that correction off before you look.
How bright the film base (the clear strip between frames, where nothing was exposed) reads depends on where in the frame you measure it. Near the edges and the rim of the holder it tends to read dark, so when you set the scan exposure, move the base to the centre of the frame and measure it there (step 6). If there's patchiness beyond the edges, rethink how your light is set up.
4. Lock your camera settings
Shoot RAW, in manual exposure. Set ISO to your camera's base ISO (around ISO 100 on most cameras). Set white balance to a fixed value too, such as 5500K, not auto. White balance doesn't change the RAW values themselves. But with inversion software that uses the white balance recorded at capture, auto white balance leaves the colour inconsistent from frame to frame. What matters is not the value but keeping it the same for the whole roll.
Fix the aperture at the value where your lens resolves best. Which value that is depends on the lens and the magnification. If you're not sure, start around f/6.3 to f/8 and compare. Refocus as in step 5 each time you change the aperture, and pick the value that renders the grain most crisply.
Fire the shutter with a remote release or the self-timer. At such close range, the shake from touching the camera turns straight into blur.
5. Focus
Focus manually. Autofocus can land in a different place from frame to frame.
Focus at the aperture you'll shoot at. On some lenses, the focus point shifts when you change the aperture.
Magnify the live view and look at the film grain in the image. Rock the focus ring back and forth in small steps, and stop where the grain looks sharpest.
Focus peaking (which highlights in-focus edges in colour) is handy for seeing whether you're in focus at all. What it can't tell you is whether the ring position where it lights up is the sharpest one, or whether turning a little further would get sharper still.
Once the centre is sharp, magnify each corner and check it too. If one side is consistently soft, the film or the camera is tilted. Go back to step 2, or check whether the film is lifting in the holder.
Each strip of 35mm film (cut into lengths of six frames or so) has its own curl. When you change strips, check the focus again.
6. Set the scan exposure
Set the scan exposure (the exposure you photograph the film at) with shutter speed alone, keeping ISO and aperture fixed. Aim for 1/3 stop darker than the brightest exposure at which the base doesn't clip in any channel in the RAW.
The base is the brightest thing on a negative, so it sets the upper limit. The brighter you scan, the less noise ends up in the highlights after inversion. Because you search in 1/3-stop steps, the exposure you find may be right on the edge of clipping, so you step back by 1/3 stop. A stop is a doubling of light, and 1/3 stop is usually one click of the shutter speed dial.
The camera's histogram and highlight warnings can't show you this limit. On most cameras they are drawn from the JPEG, not the RAW.
To set it by hand:
- Slide the film so the base between two frames sits in the centre of the image
- Start at the shutter speed where the meter reads zero, and shoot in 1/3-stop steps toward brighter until you're about three stops over. If nothing clips, keep going
- Open the RAW files in a tool that reads the raw values directly, and read the R, G and B values of the base, one frame at a time
- As you go brighter, the values stop rising and stick at the same number. That's where the RAW clips. Find the brightest frame where none of R, G or B has stuck
- Use the shutter speed 1/3 stop darker than that as the scan exposure for the roll
Tools that read RAW values include RawDigger and FastRawViewer. If you can write code, the free rawpy reads them too.
The histogram in a RAW editor shows values after white balance and a tone curve have been applied, so it's no use here. How to spot clipping, and how far apart the camera's display and the RAW can be, are covered in detail in Film scanning camera settings.
Where the base clips depends on the film stock, the light and the camera. Even with the same light, it can change from day to day. The author's LED panel once shifted by about 0.3 stop between days (a case that can't be separated from small changes in how the rig was set up). When the stock or the day changes, measure again.
7. Shoot the roll on the same settings
Shoot the whole roll without changing the scan exposure you settled on. Check focus again as in step 5 each time you change strips.
For the first few frames, it's worth opening the RAW and checking that nothing in the frame has clipped. If the light shifts partway through, for example, a frame can clip even at the exposure you set.
8. Invert to positives
The RAW files you shoot are still negatives. Run them through inversion software to get positives.
A colour negative is tinted orange across the whole film (the orange mask). Most inversion software removes that orange using the colour of the base as the reference. If the base has clipped, the reference is off and the colour goes wrong. If you can't get the colour right with the inversion settings, look at your scan exposure.
The author is also building Argent, a Mac app that inverts camera scans of colour negatives (in development). It reads a roll as one, so a roll shot at one scan exposure under one light comes out consistent from the first frame to the last. It measures the orange mask from the roll automatically, and you can point it at the base yourself if you need to.
Common misconceptions
Isn't stopping down to f/8–f/11 the standard?
It isn't necessarily where the lens resolves best. Up close, the effective f-number grows and the lens gets darker. At 1:1 it's about twice the f-number marked on the lens. So diffraction starts to soften the image at a wider aperture than you'd expect.
When the author shot medium-format film at about 0.39× with their lens, f/6.3 resolved best. Sharpness, measured as Laplacian variance, was 8% lower at f/8 and 37% lower at f/11.
If the film sits flat in the holder, f/6.3 to f/8 gives enough depth of field.
The author hasn't measured at 35mm magnifications yet. Shoot a few apertures around f/6.3, and choose the one that renders crispest including the corners.
Can't I just leave it to autofocus?
Some people do shoot with autofocus. But even the official shooting guide of one inversion package warns that autofocus varies from frame to frame. Others report autofocus drifting slightly away from where they first set it. If you use it, magnify and check now and then.
Won't a high-CRI light give accurate colour?
Many guides recommend a light with a CRI (colour rendering index) of 90 or more. But CRI describes how lit objects look to the human eye. It isn't a direct measure of whether a camera can record a film's three dyes separately.
Even so, the author's view is that if you're unsure, a high-CRI light is a safe choice. It's just that CRI isn't the only thing that shapes colour: the shape of the light's spectrum, how even it is and how steady it is all play a part.
Where doing it by hand gets hard
Every step above works without a dedicated app. Repeat them for roll after roll, though, and these are the parts that take the time:
- Hunting for the sharpest point by eye: rocking the ring while comparing magnified grain, and doing it again every time you change strips.
- Checking the corners one by one: tilt and film lifting only show if you magnify each corner in turn.
- Measuring the scan exposure again for each new stock or day: shooting the base several times and reading the values in a separate RAW tool.
- Finding clipped frames only after the shoot: clipping caused by, say, the light shifting partway through doesn't show on the camera's display. To check, you open the RAW files one at a time.
Loupe puts numbers on it, for SONY cameras and the Mac
Loupe is a macOS tethering app for scanning film with a SONY camera. Tethering means controlling the camera and shooting from the Mac. It takes on the focus, scan exposure and after-shoot checks from the steps above.
- Focus: Loupe puts a sharpness score on the live view. Turn the ring while the score rises, and stop when it stops rising.
- Checking the corners: switch the camera's ×4.2 / ×8.5 magnification from the keyboard and move to each corner with the arrow keys, without touching the camera.
- Scan exposure: draw a box over the base in the live view, and Loupe shoots at shutter speeds 1/3 stop apart and reads the RAW values. From that it gives you a scan exposure just short of clipping. You measure once per roll. As when you measure by hand, move the base to the centre of the frame before you box it.
- After-shoot checks: Loupe checks the RAW of every frame in parallel with the shoot, and marks the thumbnail of any frame that has clipped.
It works with SONY cameras supported by the Camera Remote SDK (list of supported models), on a Mac with Apple silicon running macOS 14.1 or later. Because Loupe reads RAW values, shoot RAW uncompressed or lossless compressed when you use it. Setting up the rig, adjusting the light and removing dust aren't things Loupe does. You still invert your negatives in your usual inversion software.
Loupe is coming soon. Purchase and download open on launch day, with a 7-day full trial (details).
How the example was measured
- Aperture comparison: an α1 with a Voigtländer MACRO APO-LANTHAR 110mm F2.5, shooting a medium-format (6×7) colour negative at about 0.39×. Fourteen aperture values were compared on sharpness (Laplacian variance) at the centre of the frame.